Saturday, November 17, 2012

DIY Mason Jar Lanterns

Today I am going to show you how to make lanterns out of mason jars! This is a super quick project and they look great when lit!


Items Needed:
  • Mason Jars (found at any craft store and sometimes at grocery stores)
  • 18 gauge wire (I bought 4 yards worth because I made 3)
  • Wire cutters
  • Sand (optional)
  • Tea light candles
  • Pen or pencil


Steps:

  • Take the two lids off of your mason jar. Set them aside.
  • Take your wire (I cut mine at about 2 feet) and wrap it underneath where the lid would be when placed on the jar (underneath the grooves). When the wire overlaps, at the place directly across from it, you will want to make a loop by wrapping your wire around a pen.

  • On the other side of the jar, where the wire was overlapped, twist the wires together.

  • The wire around the jar will more than likely feel loose. To correct this, take your pen and place it in the loop, twist the pen about halfway, and your wire should tighten.
  • Take the wire and curve it overtop of the jar, place it through the loop and twist the wire together to make the handle.
  • By twisting the wires together at the loop, this will enable you to later be able to undo the wires and hang it on a tree and close them again.
  • Next, I chose to add sand to my lanterns (you could fill them up with candy if you want and give it as a gift.)

  •  Take your tea light candle and place it inside the jar. If giving a this as a gift, you could always place a candle at the bottom of the jar and then fill it with candy; that way when the person  finishes the candy, they will then have a lantern!
  • Lastly, I put the lid back on my jar (minus the flat lid) to give it more of a rustic feel, but you could leave it off if you prefer to!

Saturday, October 20, 2012

Quick Fall Fashion & Lipsticks

Here are a few looks I put together for fall that are quick and easy if you're running short on time! I also included a few lipstick choices that are perfect for this time of year!


Look 1

By adding a button up shirt underneath a sweater or sweatshirt, you can instantly make the look more polished and collegiate.
Light Sweatshirt: Abercrombie & Fitch
Button Up:  Converse for Target
Bracelet: Target

Look 2

Peplum is back, ladies! This top is perfect for fall because the color is  burgundy-ish and it has a little black belt with it. The material of this top is a little heavier for those crisp days.
Top: NY & Company
Jeans: NY & Company
Necklace: NY & Company
Watch: Michael Kors

Look 3

This is an easy look because it's just a blouse with a quarter length blazer! Great for days when it's cooler.
Blouse: Lauren Conrad for Kohl's
Blazer: Lauren Conrad for Kohl's
Necklace: American Eagle Outfitters
Watch: Michael Kors

Lipsticks

Fall is a great time to try different shades of plums, red and pink! The great news about the lipsticks shown, is that with the exception of one, they are all drugstore brands! You don't have to spend a ton of money on the pefect fall shades!
From left to right: Lancome's Ooh LaLa, Loreal Infallible in Enduring Berry, Revlon Matte in Pink Pout, and Revlon Just Bitten Kissable in Lovesick.
Pink Pout, Ooh LaLa (front) and Enduring Berry (in back)

Swatches from left to right:
Revlon Just Bitten Kissable: Lovesick, Revlon Matte: Pink Pout, Loreal Infallible: Enduring Berry and Lancome: Ooh LaLa

Purses

This is defnitely my go-to bag. I adore Michael Kors' purses! This one is perfect for fall because it is brown so it goes with almost any outfit. I love that it is big enough to carry all of your necessities; it is also great for traveling. I took mine on a flight recently and was able to fit a book, iPad, and all of my other regular purse items in it. 

While I love my Michael Kors bag, I was in need of a smaller purse for when I want to go out and not carry a big bag. I specifically went to TJ Maxx to find a chain purse and this is the one I found! I love the deep blue color and the best thing is, it only cost $20!!

It looks nice wearing it off of the shoulder but can also be worn cross-body.

And that's it for my quick fall looks and lipsticks! Hopefully it gave you some ideas of what you can put together for fall fashion and makeup. You probably already have these staple items in your closet or makeup collection and can just pair them with other items for fall!

Sunday, October 14, 2012

Fall Decor in a Snap!

I absolutely LOVE fall. I am always so eager to start decorating when the seasons change. However, living in Florida, our seasons tend to blend in to one another without much of a change. This doesn't stop me from decorating for fall or winter though!! Here are some quick and easy ways to add some fallish accents to your home.


I had this vase on my ladder shelf in the living room. To spruce it up for fall, all I had to do was add in little sprigs of orange flowers!


This little owl is from Pier One. I love owls! They are so great for fall. My mom actually bought this one and gave it to me (then bought herself another one because he's so cute!) I put a small battery operated candle in mine, but you can light a real candle and put oil on the top of his head so that it makes your room smell nice. I keep my owl on our TV stand in the living room.


I keep a basket bowl on my dining room table, and I fill it with different things for each season. This year for fall, I filled it with pumpkins, gourds, sprigs of orange flowers, and a little crow that I got from my mother-in-law. You can find fake pumpkinds/goards at any craft store. I've even seen them in Publix! You could also use real gourds and small pumpkins if you would like!

To go along with my basket bowl filled with fall accents, I put a runner on my table. I got mine at Home Goods for about $10-12. Such a steal! I love this one because the orange outline on the edge is velvety. Little details like that add to the fall-ness of a piece!

And there you have it! Those are just a few quick ways that I decorated my home for fall that anyone could do!

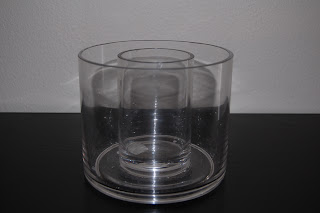
Candleholder Filled With Corks

This is another quick and easy project! My husband actually saw this idea somewhere and wanted to do it for our house, so here is how we did it!


Supplies Needed:
  • A candleholder. We bought ours at Pottery Barn because they have candleholders like this:
  • You could use any candleholder that has room for a candle and corks, but this one worked perfectly because it has the smaller area for the candle, which is seperated from the area that the corks will be.

  • A candle.
  • Corks (You can buy these from stores like Pottery Barn and Michaels, or save your corks when you finish a bottle of wine.)

Ready for the easiest project ever????

1. Add your corks to the outside rim of your candleholder. If you don't have a double rimmed candleholder, add the candle first.

2. Add your candle!!

Voila!! How easy was that!?!?


Quick & Easy Halloween Cards

It's that time of the year again! Halloween is almost here! I'm going to show you how you can make quick Halloween themed cards to send to your family and friends!


To learn how to make cards like these, keep reading!!

Supplies Needed:
  • Card paper and envelopes OR cardstock folded and cut into the normal size of a card.
  • Halloween themed paper. (I bought a pad of paper that is 4.5 in x 6.5 in from Michael's.)
  • Halloween themed accents. (I chose pumpkins for the cards I created.)
  • Photo sticker squares or glue dots (whichever you prefer or have on hand!)
  • Foam adhesive squares. (I used the 1/2 inch squares.)
  • Glitter tape (You could use ribbon as well, but the tape makes it easier to attach to the card.)
Let's Start Making the Card!!

1.  Fold your paper in half--you can make it horizontal or vertical, whichever you prefer.
2.  Use your stickers or glue dots to attach your Halloween themed paper. You will have to cut the paper to the size of the card. I chose to use two paper designs for my card. If you use two designs, you don't need to make them completely perfect down the middle, because we are adding the glitter tape and it will cover any imperfections from cutting.


3.  Next, we will add our glitter tape!! I started mine down the middle vertically.

I then added more glitter tape across the middle horizontally

4.  Now we will add the little foam square. I used this because I wanted my pumpkins to be more 3 dimensional. I added mine to where the glitter tape intersects.

5.  And now for the last step!! Place your pumpkin (or whatever accent you chose) on top of the foam square.

You now have a completed Halloween themed card! So easy and quick to mass produce!


Wednesday, October 10, 2012

DIY Favorite Team Wreath


Want to show your support for your favorite team and not spend big bucks to do so?? Keep reading!

Fall is here!! And if you are like my husband and I, then that means you are watching a lot of football! Here is an easy way to create a wreath that represents your favorite team.


Supplies You Will Need:
  • A Styrofoam Wreath (I got mine at JoAnn Fabrics for about $5)
  • Ribbon, 2 colors (Choose your team's colors. My house is divided--I am an Alabama fan and my husband is an Ohio State fan so I chose white and crimson for my half, and gray and scarlet for his half. It's also easier to cover the wreath if you choose a wider ribbon.)
  • Little wooden footballs (or whatever else you would like to decorate with. I found my footballs at JoAnn's.)
  • Wooden letters (These are for your team's name. I picked mine up at Michaels because they had smaller sized letters.)
  • Hot glue gun


Let's Get Started!

  1. Take your styrofoam wreath and your ribbon--use your glue gun to glue the start of your ribbon to the back of your wreath (this way the glue spot is hidden!)
  2. Continue to wrap your first color of ribbon all the way around the wreath. You will end up overlapping the ribbon to cover it, but that is fine. Just make sure your entire wreath frame is covered in your first ribbon color. Use your glue gun to secure the ribbon on the back of the wreath wherever you feel it is needed. I did mine every couple of wraps.
  3. Take your second ribbon color and secure it at the top of the back of the wreath with your hot glue gun. Begin wrapping it around the wreath. It is up to you how far apart you want the colors. If your team's colors include white, you may want to start with that as your base and then use the colored ribbon for this step. It is a matter of preference.  
  4. When you finish wrapping your wreath with the second ribbon color, make sure that it is glued down securely. 
  5. Lay out your wooden letters and your footballs. Take time to play with the layout and choose what looks best to you.
  6. Once you have the layout that you love, go a head and hot glue gun the pieces down.
  7. This last step is optional depending on the wreath hanger that you have. When I finished my wreath, it was too big to hang on the hanger on my front door, so I took leftover ribbon and tied it around the top of the wreath to create a bow. 

And that's it!! You should now have a beautiful wreath to show support your favorite team!!!